 |
| This is one of the main stems for the Norris adjusters I've been working on. Notice the right end of the threads, they are a bit jagged. That can be caused by a couple different factors. |
Thursday, November 22, 2012
Threads and their pitfalls...
Thread cutting can sometimes be a bit tricky. It's not terribly difficult, but there are things to watch out for. Every now and then I get a bit ahead of myself and screw up a thread (nice pun, eh?).
Making Norris adjusters
My Norris adjusters are nearly done. As with anything I do, it takes forever!
.jpg) |
| The components for two adjusters before final machining. The length of main stem will be decided after it is fit into the plane. |
Thursday, October 11, 2012
I stand corrected
It would seem that I truly misunderstood the functioning of the Norris adjuster. If you read my earlier post on the Norris adjuster, please scroll down and read the comments. Mr Davis provided a very good correction to how I thought the adjuster worked. He is quite right in his explanation. If you never try to do something, or never say it out loud, you may never learn! Thanks.
Tuesday, October 9, 2012
Norris Adjusters
(do not fail to read the comments after this post! you will find that my thought process here was not quite right when I originally posted)
I came to the point in building my infill smoother that I need to fit an adjuster. The Norris style adjuster is one of the more famous features of a Norris infill, and the plane I'm making is a No. 51 reproduction. I was going to buy one, but then I thought about making one. I've never seen an actual Norris adjuster (two of my Lee Valley planes have scaled down versions). A quick search came up with a nice article on Handplane central, here. Keep that article and pictures in mind as I ramble on. (my scanner is down, so I can't really sketch anything until I figure that out)
I came to the point in building my infill smoother that I need to fit an adjuster. The Norris style adjuster is one of the more famous features of a Norris infill, and the plane I'm making is a No. 51 reproduction. I was going to buy one, but then I thought about making one. I've never seen an actual Norris adjuster (two of my Lee Valley planes have scaled down versions). A quick search came up with a nice article on Handplane central, here. Keep that article and pictures in mind as I ramble on. (my scanner is down, so I can't really sketch anything until I figure that out)
Monday, October 8, 2012
Getting back to work
I haven't done any work on my infill smoother for a while. I found a few hours on Saturday to knock out a few tasks. Check it out in the page links.
Wednesday, October 3, 2012

Sunday, September 16, 2012
Cutting block finish
I've never been happy with using just block oil on my cutting boards. I think it's too thin. I started making my own a while back. Instead of buying more expensive block finishes, all you need is some mineral oil, a block of bee's wax, and a jar.
(oh yeah...as an added bonus, it smells really good too!)
(oh yeah...as an added bonus, it smells really good too!)
 |
| Some mineral oil (General Finishes in this case), a mustard jar, and a block of bee's wax. |
Sunday, September 9, 2012
Lee Valley Low Angle Jointer
One thing a person will notice walking into my shop, is an abundance of Lee Valley tools. I like them a little (OK, a lot). Another thing that person would notice, is a lack of Lee Valley bench planes (or any "premium" planes). I have a few of their specialty planes and that is part of what drove me to buy the Low Angle Jointer.
My purchase of the LA jointer represents my first "premium" bench plane and my first bevel up plane. I wanted a wider jointer than my woody, which has only a 1.5" blade. I liked the idea of the versatility of this plane as well. Change an iron, and basically change the plane. Add a fence and make shooting an edge an effortless job.
So, here's my thoughts.
 |
| Fresh out of the package. The 25 degree iron is installed, plus I got a toothed iron, and the shooting fence. |
Sunday, July 22, 2012
A bit of advice ( been taken for a fool)
This isn't 100% woodworking related, but.... anyway, last year I made a down payment to a well known toolmaker for a dovetailed smoothing plane. Soon after taking $250 from me, he closed up shop and went radio silent. This guy had a good reputation, came recommended by the likes of Chris Schwarz. So, what happened? I don't know. I was one of six or seven customers who paid good money and got swindled. (No, Mr. Schwarz is not to blame in the least!) The planemaker in question took advantage of the goodwill given him by some of America's top woodworkers.
Fast forward to this year. The other way in which I occupy my time is by tinkering with old British motorcycles. I built my 1967 Triumph Bonneville, and I built a '71 Bonneville for a friend. Between the two bikes, I have hundreds of hours of work and several thousand dollars invested. My labor on my friend's bike was FREE. His engine tried to eat itself, so another friend and I covered the cost of the rebuild (aren't we nice). I like to hot-rod and show off, which lead to me breaking a valve and destroying my engine. So...off to the engine builder that I've worked with for a few years. Sent the parts, related my budget, got an estimate, and sat and waited. Four months later, still no engine, the estimate doubled and here I am without a machine. The kicker? I was informed in May of that everything was ready to go, and the price was "X". Well, a week later, it wasn't done yet...then it was ready...then it was not (and so on). When I confronted the builder on it, he said my attitude was bad and blah blah blah. Oh yeah, and the price doubled!
Longer story longer, here's a bit of advice. No matter who you're dealing with, get everything in writing. Get a hard number and delivery date. I don't care how awesome their reputation is, there is a chance that all they want to do is take advantage of your trust. Don't waste your money on crooks.
(i had to rant a little, and it doesn't actually make me feel that much better)
Tuesday, June 26, 2012
Another note about back irons (sort of)...
Ok, so I just gave you a bunch of thoughts and opinions and glossy pictures talking about the fun of tuning a back iron. How 'bout I throw a monkey wrench in the works and say that the size of the mouth is more important? And then, once I've said that...how bout I post a picture of my favorite smoother? A tiny little five and a half incher, with single 1/4" iron and a tight mouth. Let's not forget the 55 degree cutting angle. Yeah, this plane pretty much rocks.
 | ||
| Yup, love this thing. |
Back irons, pt 3
In part two we looked at the back iron for a jack plane. Now lets have a look at the role of the back iron in a smooth plane. I have an old Lakeside #3 size plane that I've never been able to tune all that well, don't know why, but I have just had a hard time with it. Like my jack plane, it has a two inch iron. Anyway, the fit of the cutting iron and back iron looks decent. Let's see how it performs.
 |
| The smoother set to go. I have the back iron set at .010" from the cutting edge. |
Sunday, June 24, 2012
Back irons, pt 2
Ok, so I said in part 1 that I would prep the back iron for my Stanley No. 5. Here goes...
 | ||
| Here I have cleaned up the leading edge of the back iron. I put it in a honing guide and ran it over some 600 grit sand paper. If you look close at the leading edge of the cutting iron, you'll notice that some knob decided to drop it right before taking the picture. (shhhh...I'm the knob) |
Saturday, June 23, 2012
Back irons, pt 1
Back iron. Chip breaker. Call it what you will. It's part of the hand plane puzzle (unless you use only single iron planes).
 |
| The back iron from my old #3 smooth plane. |
Friday, June 15, 2012
A name I've never heard
While poking around today I found a neat old plane iron by a maker that I've never heard of before. It's a laminated blade with a W. Ash & Co chip breaker. The blade is from Wm. Bingley. If anyone that reads here happens to know anything about Wm. Bingley, please drop me a line! I'd like to put the history to the tool. My first guess is English, but that is just a guess.

 Update: I also posted this at Sawmill Creek. Here's the thread, lots of good info here.


Saturday, May 26, 2012
A simple project, just for fun
I need a better way to store my kitchen knives. I've seen magnetic holders for sale everywhere, but wanted to make it myself. They are simple enough to make. This is more of an artsy-craftsy sort of thing just to get my hands working again, nothing special. However, if you spend any amount of time in the kitchen (as I do) then it is very hand. Plus, instead of saying, "I bought that at Ikea (or wherever)," you get to say that you made it yourself.
 |
| The back side, with the positions of the magnets marked out. The thin piece at the top of the pic will be the face. |
 |
| Magnets! I am using 1" dia magnets. On the right is a cup, on the left is a cup/magnet assembly. The magnets may be strong, but they need a little help since there will be a slice of wood between them and whatever they are holding. The cups help to focus the magnet's efforts. |
Two things that suck are...
...riding 30+ miles in the rain with no visor on your helmet and cutting dovetails in Aspen. Both of which I did this weekend. None of my chisels are set up to cut softwood, but I try anyway. I just wanted to knock out a little bit of practice. I also did a joint in soft maple. Getting better (especially when you consider I haven't done anything for months!)


Thursday, May 24, 2012
A kick in the pants
I can never afford wood. Kind of a bad problem for someone that wants to work on wood. So it was a pleasant surprise the other day when one of my friends pulled up to my garage and opened up his van to unload this:
 A nice pile consisting mainly of oak and some cherry. There are some nice 2 inch thick pieces and a few 4 inch square glue ups. The nice part was the price: FREE! I hope this is the kick in the pants that I need to start getting some projects done.

Saturday, May 19, 2012
Almost back. Sort of.
Hi, all. Between doing a bunch of wiring in my house and rebuilding my chopper, there hasn't been much time for woodworking in quite some time. My other major issue was the slow death of my computer. At six and a half years old, I finally replaced it last week (not that I could really afford to, but it had to be done). I've got some ideas brewing, and hope to be back into some projects soon...now that I have some free time again, and I no longer need a seeing eye dog for the internet. See y'all soon!
Saturday, February 25, 2012
Stair saw
As crazy as things have been lately, between rewiring my house and working on my bike, I set aside a little time to get started on making a stair saw.
 |
| The donor, a clunky old Craftsman saw that I got for the hardware. |
 |
| A few minutes of work with the plasma cutter...if you've never used a plasma cutter, they are one of the coolest tools EVER! High pressure air is forced over an arc through an orifice, creating a plasma, which is at some incredibly ridiculous temperature, which then proceeds to actually vaporize the steel. |
 |
| One of the blanks. |
 |
| The new blade. As you can see, I did a much better job cutting the slot on the left, a bit of clean up remains on the right side. More to come! |
Sunday, February 12, 2012
Busy busy busy
For any regular readers here...I just realized I haven't done any woodwork, besides some bad dovetail practice for a few weeks! Between remodeling the kitchen, and working on my bike there hasn't been time. Yeesh! I've got tools to build, and projects to work on. Hopefully I can get back into the groove soon.
Thursday, January 26, 2012
More on hollow grinding
Yesterday I talked a little about hollow grinding on one of my block plane irons. Here's a little more detail, with some super-high-resolution CG. Er...scanned pencil drawings.
 |
| Top is hollow ground, bottom is flat. The shaded area shows the part of the iron that's removed when applying the primary bevel. The dark area is what's removed during honing. The hollow grind offers more relief behind the secondary bevel, and gives more time between regrinds. |
Wednesday, January 25, 2012
Hollow grinding
One of the few power tools I have is my suicide grinder. Portions of the rebuild have been posted here. It's a belt driven General. It's old as dirt, but the new belt and bearings did it some good. Since last posting about it, I've gotten it bolted down to the table in my basement. I also picked up a Veritas grinding rest. Let's have a look...
 |
| One of the blades for my block plane. That bevel is flat. To resharpen it on stones would mean honing away all that metal on the cutting edge down to a 20 degree angle to reestablish the primary bevel. Then we'd have to adjust and hone the secondary bevel (in this case 25 degrees). Yuck! That's a lot of work, and that's why I have a grinder now. |
Monday, January 23, 2012
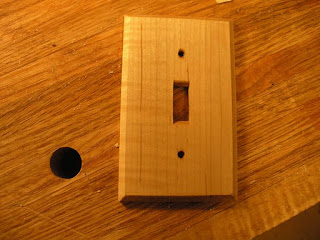
Switch plate
Made a new switch plate out of maple. Purdy simple stuff, but a neat project none the less.

Thursday, January 19, 2012
LN chisel (finally)
Anywho, up until recently my bench chisels have been garbage. I made a step in the right direction with a couple of new Stanley 750's. They are light years better than my Footprints. I have also rehabbed a couple old Craftsman chisels. That left one Footprint that needed to be ditched...the 1/4". I'll let my poor photography tell the rest.
 |
| Ta-da! O-1 steel 1/4" bevel edge chisel. After a couple of months on back order. I kinda feel like Garth when he finally had the cash to buy his Strat. |
Stoning a saw
We talked about sharpening a cross cut saw here. I mentioned a bit about tuning, particularly stoning the teeth to correct the set. This is just a short post to show what stoning is.
 |
| Just as the name suggests, run a stone down the teeth. Lightly! If the saw pulls to the left, stone the left side, and if it pulls to the right...you guessed it. I use an old oil stone that was rescued from a bucket of rusty tools. I wouldn't use a water stone for this. |
Tuesday, January 17, 2012
The woodwork might get thin...
If the projects here at the Monastery look like they're getting a little thin, there's a reason. LOML and I had some serious problems back in October, and we're just now working through them. It's going to take some time, and probably will have to give her something shiny. But that's what you do for the one you love...
...that gun box
Oops! I never posted a picture of the display box for my Dad's revolver after hanging it up! For anyone that might have been interested, he loves it. It's been hanging since Christmas Eve.


Wednesday, January 4, 2012
My new Moxon vise
I've been wanting to build one of these for a while. They seem to be a good way to hold work for joinery cutting. This one will hold a piece just over 12" wide. It's made from maple. Overall, a pretty simple piece to make. I still have some finishing touches to add, but it is functional and will get me where I want to go. Sometimes I forget to take pictures, so this isn't an in-depth build post. I'm just going to point out a few things.
 |
| The (almost) finished product. Two screws, three boards, simple. I added washers underneath the handles so that they don't turn right up against the outer jaw. Is it called a jaw? Maybe chop is better? Anyway, the piece that is in there is clamped tight enough that you can lift my bench with it. |
Subscribe to:
Posts (Atom)