 |
| Top is hollow ground, bottom is flat. The shaded area shows the part of the iron that's removed when applying the primary bevel. The dark area is what's removed during honing. The hollow grind offers more relief behind the secondary bevel, and gives more time between regrinds. |
Thursday, January 26, 2012
More on hollow grinding
Yesterday I talked a little about hollow grinding on one of my block plane irons. Here's a little more detail, with some super-high-resolution CG. Er...scanned pencil drawings.
Wednesday, January 25, 2012
Hollow grinding
One of the few power tools I have is my suicide grinder. Portions of the rebuild have been posted here. It's a belt driven General. It's old as dirt, but the new belt and bearings did it some good. Since last posting about it, I've gotten it bolted down to the table in my basement. I also picked up a Veritas grinding rest. Let's have a look...
 |
| One of the blades for my block plane. That bevel is flat. To resharpen it on stones would mean honing away all that metal on the cutting edge down to a 20 degree angle to reestablish the primary bevel. Then we'd have to adjust and hone the secondary bevel (in this case 25 degrees). Yuck! That's a lot of work, and that's why I have a grinder now. |
Monday, January 23, 2012
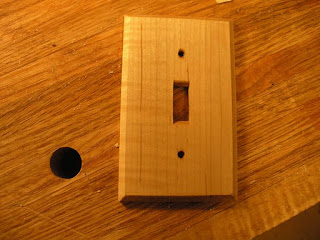
Switch plate
Made a new switch plate out of maple. Purdy simple stuff, but a neat project none the less.

Thursday, January 19, 2012
LN chisel (finally)
Anywho, up until recently my bench chisels have been garbage. I made a step in the right direction with a couple of new Stanley 750's. They are light years better than my Footprints. I have also rehabbed a couple old Craftsman chisels. That left one Footprint that needed to be ditched...the 1/4". I'll let my poor photography tell the rest.
 |
| Ta-da! O-1 steel 1/4" bevel edge chisel. After a couple of months on back order. I kinda feel like Garth when he finally had the cash to buy his Strat. |
Stoning a saw
We talked about sharpening a cross cut saw here. I mentioned a bit about tuning, particularly stoning the teeth to correct the set. This is just a short post to show what stoning is.
 |
| Just as the name suggests, run a stone down the teeth. Lightly! If the saw pulls to the left, stone the left side, and if it pulls to the right...you guessed it. I use an old oil stone that was rescued from a bucket of rusty tools. I wouldn't use a water stone for this. |
Tuesday, January 17, 2012
The woodwork might get thin...
If the projects here at the Monastery look like they're getting a little thin, there's a reason. LOML and I had some serious problems back in October, and we're just now working through them. It's going to take some time, and probably will have to give her something shiny. But that's what you do for the one you love...
...that gun box
Oops! I never posted a picture of the display box for my Dad's revolver after hanging it up! For anyone that might have been interested, he loves it. It's been hanging since Christmas Eve.


Wednesday, January 4, 2012
My new Moxon vise
I've been wanting to build one of these for a while. They seem to be a good way to hold work for joinery cutting. This one will hold a piece just over 12" wide. It's made from maple. Overall, a pretty simple piece to make. I still have some finishing touches to add, but it is functional and will get me where I want to go. Sometimes I forget to take pictures, so this isn't an in-depth build post. I'm just going to point out a few things.
 |
| The (almost) finished product. Two screws, three boards, simple. I added washers underneath the handles so that they don't turn right up against the outer jaw. Is it called a jaw? Maybe chop is better? Anyway, the piece that is in there is clamped tight enough that you can lift my bench with it. |
Subscribe to:
Posts (Atom)