Here's to the end of 2011. Glad to see it go. Blew up my chopper. Spent some time in the hospital. Spent way too much fixing the furnace. Working more every day, with less to show for it.
On the plus side, I moved into a new job. I learned a lot about woodworking. Made or acquired some really neat tools.
Today I got most of the way through building a Moxon style vise. A tool that I wish I had from day one. I'll post it here when it's done. I also brought back to life a friend for my battered old chisel...and thus took another crappy chisel out of commission. The grinder build is nearly done...and has been, but I can't remember where I left the bag of hardware!
In all, it's not been a bad year. A safe and happy New Year to you and yours. For me? It's a quiet evening alone (the best kind), Chateaubriand, a glass of fine Belgian beer, and some relaxing tunes. Well...maybe not relaxing. Probably something dark and heavy. It was a heavy year, after all.
So, with that, I bid adieu to 2011! And welcome in 2012 (this is as festive as I get).
Saturday, December 31, 2011
Friday, December 30, 2011
More on winding sticks
Yesterday, I made the statement that no hand tool shop should be without winding sticks. After almost two years of trying to learn this stuff, I only just made my first set a month or two ago. Wish I would have done that earlier! They are easy enough to make.
What the winding sticks do, is indicate the twist (wind) in a board. The first step in stock preparation is to knock the high spots down. The best way to find out where they are, is (you guessed it!) winding sticks!
What the winding sticks do, is indicate the twist (wind) in a board. The first step in stock preparation is to knock the high spots down. The best way to find out where they are, is (you guessed it!) winding sticks!
 |
| Before planing for the first time, set the sticks on the board. Get your head down and sight across them. This is where the light band on the front stick becomes important. You'll see the wind in the board. The sticks will exaggerate the amount of twist to make it easier to see. |
Thursday, December 29, 2011
Some measuring tools
Just a quick post about some measuring tools.
 |
| A set of winding sticks. Something that no hand tool shop should be without. |
Monday, December 26, 2011
New Stanley Sweetheart Chisels
My current set of chisels is from Footprint. I don't like 'em much. The handle shape is too bulky, and they hold an edge like butter. I've made them work, but I've been itching to replace them. Some time ago, I got a 3/8" Stanley SW to try out. I like it. It takes and holds a decent edge. I've never used a Lie-Nielsen or Narex...so I can't make the comparison, but it works for me. It's also a huge step up. Today, I picked up the 1/2". I wanted to get the 1/8" as well, but the shape of the blade didn't look right to me, I'll have to look at a Lie-Nielsen to fill that slot, I think.
 |
| My new 1/2" (top) next the my 3/8". I liked the 3/8" enough to make me feel confident about getting the 1/2". |
Saturday, December 17, 2011
Iron envy?
I just got a "new" iron from a fellow Creeker. It's a 2 3/4" Baldwin. It's damn near massive enough to have its own gravity. No idea what I'm going to use it for (though there's an idea floating around in my head).


 |
| That's a 2" Stanley iron, starting to look kinda wimpy. |
Thursday, December 15, 2011
The gun box is almost done...
Nearing the end of this project.
 |
| Sizing up the back. I traced the inside of the box onto the back panel. |
Saturday, December 10, 2011
Some new planes...
I recently purchased two raw plane casting kits from St. James Bay Tool Co. One is a miter plane, and the other is a Norris no.51. Both are in bronze, with the miter plane having a steel sole. As I start to work on them, I'll likely start a separate page for each to update progress. There is a lot of machine work to do, and will likely take me some time.


Thursday, December 8, 2011
Planing board
 |
| A simple way to plane thin boards. This is obviously not an original idea. I glued two strips down to a flat board in a "T", the force from planing holds the piece into the corner, and voila! We can plane thin stuff. Another perk is that there is no clamp to distort the piece. |
More on the gun box
Building the display box for the Navy revolver has been a lot of fun, and I'm learning a lot from it. The grooves for the back have all been cut into it. The panel will be inset 1/2" to allow for the wall mount, which will be a French cleat. Following the suggestion of a fellow Creeker, I elected to groove all for sides straight through. (there were lots of good suggestions, but in the end I had to pick just one to go with) This will leave hollows in a few of the tails. That problem is easily remedied by making plugs that will fill the gaps, and be largely invisible. We'll get to those later. Here's the grooving operation, and some of the work holding solutions to overcome the fact that sometimes smaller pieces are harder to clamp.
 |
| The sides, top, and bottom, all grooved. I'll need to put plugs into the ends of the grooves on the two tail boards. |
Wednesday, December 7, 2011
The gun box, continued...
I got my dovetails all cut, and the box actually fits together! This box has two "firsts". First successful DT's (which I started here), and first hand ripped book matched panel, here. Next on the list is to mount the panel into the box. I'm getting some ideas over on the Creek as to the best way to do it, but that task should be taken care of in the next day or two.
 |
| This is the cherry that I resawed for that earlier post. The next step is cutting it to size. Thickness is just about right, it just needs final smoothing. Working this would be a lot easier with a planing hook, and I think making one would be a great article to post here. Maybe I'll do that in the next couple of days. |
Monday, December 5, 2011
Rebuilding the Suicide Grinder (part 3)
I finally got around to working on the suicide grinder some more. A few weeks ago a built the frame, a bit of cutting and welding. Since then I've been trying to catch up on other stuff. Today I drilled and tapped the mounting holes for the motor and grinding head. I also drilled the holes to mount to the bench. I'm just glad I don't have to lift this thing again. As an assembly it's terribly heavy! All that's left to do is drill the bench for the mount bolts and make or get tool rests.


The gun box
I'm horrible at dovetails. I've never made a good one. But I'm on my way
now. These are the fiddly bits for the display box for my dad's Navy
revolver. Are they going to fit perfect like if Cosman or Charlesworth
did them? I doubt it. Will it be a bit of honest hand made joinery? Yup.
I know my Dad will appreciate it. And after all, what a better present
to give to Dad than my first dovetailed box. This is just a couple of
pictures of the progress, nothing super exciting. I'm just happy that
I'm close to completing a project using dovetails.
 |
| Rough mock up to make sure I've got the size close. All the ends are shot nicely and square. The bottom will protrude, though not as far as in this picture. |
Saturday, December 3, 2011
Disston key hole saw
I really shouldn't be out tool shopping right now. Well, kinda. I wanted a saw to restore for my cousin as a gift...and that one is kicking my arse at the moment. This little gem, however, jumped out of a basket at the store screaming, "take me home, I'm gorgeous." Why doesn't that happen when I'm out having a drink?
This is a Disston key hole saw. By my checking around, best I can figure is that it is pre-1875. It's seen better days, but is still a fine piece of work. The handle is super comfy, and is more befitting a dovetail saw. I'm likely to sell this, but not before I pattern the handle and take more pictures of it so that maybe one day I can reproduce it.

This is a Disston key hole saw. By my checking around, best I can figure is that it is pre-1875. It's seen better days, but is still a fine piece of work. The handle is super comfy, and is more befitting a dovetail saw. I'm likely to sell this, but not before I pattern the handle and take more pictures of it so that maybe one day I can reproduce it.

Thursday, December 1, 2011
1000 Views!
Just hit my first 1000 views here at the Monastery! Hopefully someone has learned something. I know I've already learned quite a bit by trying to break things down into meaningful bits for posts.
Tuesday, November 29, 2011
Working on that infill (still)
I've been going into work early to squeeze in some time on my infill during the week. I don't have a decent vise for metal work at home at the moment. I just pack up my little red tool box full of files and spend 45 minutes or so putzing away before starting work. It's a nice way to start the day. I'll have to do a separate post about the saw and files...and the cold chisel. The little things in life can be extremely satisfying, and for some reason, the cold chisel that I've been using is one of those things. Anyway, onto business..
 |
| Here's the brass sides. I did a little additional filing to help sharpen the corners a bit before marking them onto the steel sole. We'll get back to these guys for some more filing and drilling, hopefully later this week. |
Saturday, November 26, 2011
In keeping with a philosophy...
In many ways, I try to be a minimalist. In reality, I'm not. I'm getting there though. Today I sold a bunch of books, CD, and DVD's that I'm not into anymore. Someone else can enjoy them. I would have liked to get more for them, but some of that money was spent when I was in high school or college! So it's new money to me. Small house (750 sq ft), small car (a prism, seriously, I drive a Chevy Prism). On the books and movies, I pared down my total collection to the books that I really can read again, and movies that I really enjoy watching. I've been done with punk rock for a few years so that stuff is mostly gone (except for a few choice albums...some stuff just gets ya). What's this got to do with woodworking? Everything. I have some tools that I'm not using. They are being or have been sold. My collectible stuff isn't going anywhere, you'll have to pry my Baldwin planes out of my cold, dead fingers. I intend to get more of those, as a matter of fact. Maybe I took Chris Schwarz too seriously (if you haven't read The Anarchist's Tool Chest, you should...if you can't afford it...I'll loan it to you). Maybe the economy sucks and I can't get overtime. Maybe, at the tender age of early thirty something, I'm finally becoming a grown up. Maybe, I'm just a spaz case. Who knows? Or it could be that I had a crappy day, shelled out $400 to fix an aging furnace and screwed up a project to boot. Again, who knows? Anyway, every day I find that I'm trying to pare back on "things." If it ain't useful, it ain't welcome here anymore.
Now...let's see how the bright new plane I just bought fits into the this equation. Hmmm...I guess you'll find out when it arrives, it should be a treat!
I also decided it was time to read some Machiavelli, so it could get really weird around here.
Now...let's see how the bright new plane I just bought fits into the this equation. Hmmm...I guess you'll find out when it arrives, it should be a treat!
I also decided it was time to read some Machiavelli, so it could get really weird around here.
Friday, November 25, 2011
Resawing
Ripping is one thing, resawing is a whole other animal! You can't build everything from inch thick lumber, and buying stuff that's already brought down to a thinner section is expensive. What's a budding neanderthal to do? Steve Branam shows his technique for resawing here. I figured that would be a good place to start. I got some inch cherry and went to town.
 |
| The intended victim. It's a pretty piece of cherry, and I hope to keep it pretty! |
Scrub plane
Not everyone is in to scrub planes. I am. I've read differing opinions on their use and origin. For instance, some say that they are a rather late comer to the plane game and are a bit of a cheat. Others say they are of German descent and were meant for edge preparation. I don't have the research resources to confirm or deny any opinions. All I know is that they are infinitely useful. I especially like them for preparation of very rough edges...like those found on stock coming straight off the mill saw.
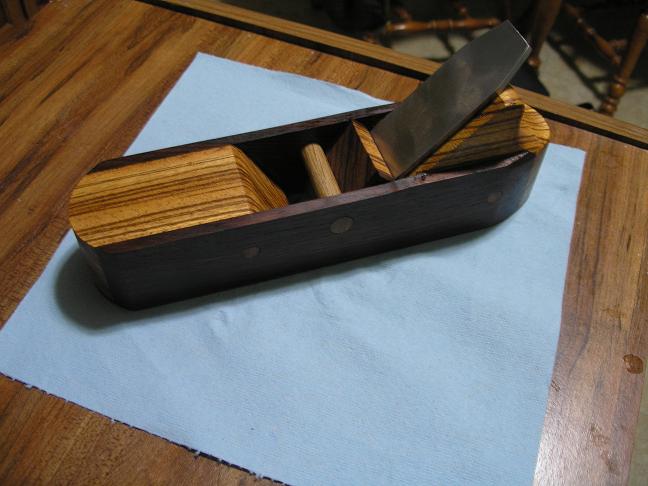 |
| Back about a year ago when this thing was new. It's a bit of a fashion statement. The wood selection was on purpose...to annoy those who are more sensible. Let's just say that I'm not quite into these stark contrasts much anymore. |
Thursday, November 24, 2011
The joy of toolmaking
It's a very satisfying feeling when you can make and use your own tools. It's even more so when they perform well. This is my jointer, 23 1/2" long, with a 1 1/2" x 1/4" iron that I made.
 |
| Yes, the tote is ugly. And yes, I put it in a bad spot for adjusting the iron. |
Wednesday, November 23, 2011
Cutting a tenon
Instead of fiddling with tools tonight, I decided it was high time I did some actual furniture building. I've been slogging through a small coffee table. I'd build a larger one, but then I wouldn't be able to get around it in my tiny house. To build the table I need to make several mortise and tenon joints. Being a noob, this is a joint I have never completed before, well, properly anyway. My kitchen utility table has those loose tenon thingies (which I hate, and I'm angry about WHY I ended up using them, but that's a gripe for another day). I've tried practicing a few times but never had much success. But then...
Derek Cohen has a great write up about how to get through the M&T joint here. I tried to follow his method, and did pretty well. So, thanks, Derek! With some practice, I'm sure I'll have this down in no time. Below is my first shot, I've got several more to get through.
Derek Cohen has a great write up about how to get through the M&T joint here. I tried to follow his method, and did pretty well. So, thanks, Derek! With some practice, I'm sure I'll have this down in no time. Below is my first shot, I've got several more to get through.
 |
| The cheek cuts marked on the end grain. I chipped it out a bit on the shooting board...I really need to consider a dedicated mitre plane. The board is 3/4" thick, so the tenon will be 1/4" thick. |
Thursday, November 17, 2011
Infill progress
Finally! I knew I could get my rear end kicked into gear on this thing. I got the sole squared and cut to size and pierced the mouth. I originally set out to do most of this work with a hack saw and files. Like all smart (ok...slightly better than stupid) people with access to a mill, I decided that 100% hand work was not practical. If I had a large disk or belt sander at my house, I would have used those. Anyway, I ran the sole through the bandsaw and milled the final dimensions.
 |
| The bottom of the sole. By piercing at an angle in the mill I was able to get an accurate angle for the mouth. My hope is that this will save me work later. There is a little bit of work to do by hand to square off the mouth. |
Wednesday, November 16, 2011
My infill plane (almost)
Just thinking that if I post a picture showing the pieces of the plane I started forever ago might spur me into finishing the damned thing. Looking to finish it up at 6" long with a 1 3/4" (ish) iron. That's the last piece of O-1 that I have right now, and it can yield up to a 2" iron. It's a quarter inch thick too!
 |
| Guessin' I know what my lunch time government job at work is for the next few days! |
Tuesday, November 15, 2011
Sandblasting files
I ran across an interesting article on WK Fine Tools, here. It was about using sandblasting to sharpen files. The article was originally published in 1878. I decided to give it a shot. I grabbed a few old files that didn't cut so well and gave them the treatment. I took a few swipes with each one first and then after. I could feel a little bit of a difference in each, one was markedly better. I think I'll do this again some time with a more quantitative approach, and try to take the "feel" out of the equation.
 |
| Files before blasting. Old and ugly. |
 |
| Files after blasting. You can see a few bits of steel in the file second from the bottom, I didn't brush it before the picture. For now, I think the blasting worked. Later on, I'm going to try something akin to the test from the article. By akin, I mean not taking 90,000 + strokes! |
Up close and personal
I love machine work. I practically lived in the machine shop when I was in high school. Then came college, then the Army. The last couple of years I've been able to get back into it with my new job. To this day, I still get giddy when I get to work within a few thousands of the vise of a mill, or the chuck of a lathe.
 |
| About .012 away from the chuck. |
 |
| .010" over the top of the vise. |
Sunday, November 13, 2011
Popping a saw etch
Enhancing, or popping a saw etch (as I like to call it, because I make up my own terms for stuff), is a bit of an art. It's a picky little task, and I'm still learning it. With my first few saws I didn't even know that I could pop the etch out. They're all waxed up now, so I'm not about to go and strip them to work on the etch. After working on my first few saws, I ran across an article on WK Fine Tools by Bob Sturgeon, here. I wanted to give it a shot because I had a mystery saw with a "Warranted Superior" medallion and a faded etch. Obviously, the WS medallions don't tell you much. In the end, the etch was too far gone to get anything recognizable to learn the origin of the saw. Rats. Currently I've been working on my second Atkins No. 53 and the Simonds from hell. I decided to give it another go, though the etches were very weak to begin with, I was able to improve them. To have gone farther probably would have lead to their complete obliteration. (awesome, I knew I was going to be able to use "obliteration" in a sentence today)
Saturday, November 12, 2011
Simonds Saga (part 2)
Part one is here .
I couldn't let this saw continue to mock me. I could hear it laughing
whenever I was in my shop. When your shop is only 77 square feet, it's
hard to escape the taunting of a tool that's out to get you. "Now is the
time!" I said. In reality, I needed an excuse to avoid sanding drywall
for a bit. The drywall can wait until tomorrow.
 | |
| Back into the trusty saw vise for another round. I jointed the teeth one last time, and went for it. |
Friday, November 11, 2011
Rebuilding the Suicide Grinder (part 2)
Part One is here.
Here's the basic components for the grinding "head". I think I'll call it that from now on, yes, the grinding head. So, we now have a pair of Koyo 6023ZZ bearings (the ZZ is secret bearing code for two metal shields), these are really common bearings, about $4 each. How common are they? They're so common that they are the same bearings that I use for the front wheel of my chopper. If I trust my life to them, I can trust my irons to them. They're 17mm x 40mm, by the way. Also have the new belt, a minor investment of $13. The axle has been cleaned and deburred. The nuts and side plates for the wheels have been cleaned as well, with some chemical conversion coating applied for good measure. Next step is to lay out the base plate. I could mount straight to the bench, but then it would all be too easy!
Here's the basic components for the grinding "head". I think I'll call it that from now on, yes, the grinding head. So, we now have a pair of Koyo 6023ZZ bearings (the ZZ is secret bearing code for two metal shields), these are really common bearings, about $4 each. How common are they? They're so common that they are the same bearings that I use for the front wheel of my chopper. If I trust my life to them, I can trust my irons to them. They're 17mm x 40mm, by the way. Also have the new belt, a minor investment of $13. The axle has been cleaned and deburred. The nuts and side plates for the wheels have been cleaned as well, with some chemical conversion coating applied for good measure. Next step is to lay out the base plate. I could mount straight to the bench, but then it would all be too easy!
 |
| Simple enough. Just remember to put the belt on before installing the axle. Otherwise, you gotta take the whole kit and kaboodle apart again! |
Wednesday, November 9, 2011
Panel Gauge
This is a panel gauge I picked up a while back. They are very nice to have, since a typical marking gauge is only 6". It had no pin or cutter, presumably it got lost along the way. I cut a drill bit down, and reshaped the end so I could have a cutting gauge as opposed to a pin. Using a cutter makes a mark more like a marking knife, they tend to tear less. The button on the end, just inside of the cutter makes a nice little depth stop, it limits how far you can push the cutter down.
 |
| Look closely at the shape of the cutter, the working end is facing up. Also shown is the "depth stop." I believe that the original pin or cutter was mounted in the button. |
Monday, November 7, 2011
Rebuilding the Suicide Grinder (part 1)
I've started the clean up process for my General grinder. First mistake has already been made, the decals didn't survive the hot water wash. They stood up to PD-680 solvent, but the water got 'em in the rinse. Damn. The housing is ready for the new bearings, and the axle just needs a small burr removed from the pulley area.
 |
| The housing, all cleaned up. |
Saturday, November 5, 2011
Craftsman SUCKS!
Ok. I'll calm down just a bit. I'll preface this post by saying that I've been a loyal user of Craftsman tools for most of my life. However, anything they have made over the past several years that has electrons flowing through it is junk. Let me say that again: Electron powered Craftsman tools are JUNK! You get what you pay for, and when you pay for something made in China, you get JUNK. JUNK! There, junk in all caps three times. (I could share the drama of my miter saw, but that'll just get my blood pressure up)
I guess I didn't calm down much. The only reason I bought the Craftsman 6" grinder today is because I had a gift card. Hey, I thought, it might not be the best grinder in the world, but I'm a handy guy, and I can make it sing. Well, I'm no voice coach, and this effin' thing needs a team of coaches to sing. Needless to say, it's going back tomorrow, and I want my money back. This is unacceptable. (now...on to the juicy pics...)
I guess I didn't calm down much. The only reason I bought the Craftsman 6" grinder today is because I had a gift card. Hey, I thought, it might not be the best grinder in the world, but I'm a handy guy, and I can make it sing. Well, I'm no voice coach, and this effin' thing needs a team of coaches to sing. Needless to say, it's going back tomorrow, and I want my money back. This is unacceptable. (now...on to the juicy pics...)
Taming of the skew, revisited
So, the other day I took a shot at tuning my D.Malloch skewed rebate plane (or rabbet, or whatever, I prefer rebate), here. My conclusion was that the skew of the iron was off and it needed a good regrind. However, at the moment, I don't have a grinder hooked up here at my house. This is all the more reason to get my suicide grinder put back together and mounted to a bench. Anyway, I stopped at my Dad's house today, and we have a grinder there. I get free reign of his tools because I bought some of them...they just live at his house.
I should have taken a picture of the iron before regrinding, but I forgot. Basically, I set the iron in the plane and lined it up so that it was flush with the reference side. I then scribed a line across the back of the iron to establish where the skew should be ground. After that, it was a matter of being patient at the grinder and trying not to rush it. The results...


I should have taken a picture of the iron before regrinding, but I forgot. Basically, I set the iron in the plane and lined it up so that it was flush with the reference side. I then scribed a line across the back of the iron to establish where the skew should be ground. After that, it was a matter of being patient at the grinder and trying not to rush it. The results...


Thursday, November 3, 2011
Cutting a stopped dado
I've never cut a stopped dado. This post will follow me through the
first one. Seriously, I didn't even practice one first. The problem with
a stopped dado lies in the fact that you're stopping the darned thing! We're also working across the grain.
Through dadoes are a bit easier, and if we can figure the stopped
version out, we can do through dadoes all day long. Let's see how it
goes...
 |
| Marking out. This dado will be about a half inch wide, by four inches long. Final depth is a quarter inch. Marking out is similar to marking a cross cut. Lay the square down against your reference side and use a marking knife to cut the line. Several light cuts, with the bevel toward the waste (in this case the center of the dado) will get you there. Light cuts with the knife are easier to control. It helps to lightly mark the edge of the board down to the final depth...this will help with sawing. That's a Stanley SW square, dead nuts accurate and a great tool. I'll talk about that thing another day. |
Scrapers
 |
| The card scraper. A simple piece of saw steel. These come in different sizes and thickness. Thinner is easier to wield, but leaves a wavier surface. Thicker can leave a flatter surface, but can break your fingers. Try different ones to find what suits you...that's the best advice I can give. |
Wednesday, November 2, 2011
Damn, sometimes them ole tools are sweet!
Nothing real instructive here, I just feel the need to gloat a little. A few weeks ago, I picked up a junker of a saw. An Atkins 53 to be exact. I loved the handle, the blade was a nice length and dead straight. I resharpened it to a rip profile because I wanted a short ripper. I don't have a saw bench right now, so a shorter rip saw is easier for me to use (not to mention they fit my arm length better). Anyway, I had to rip a piece of Ambrosia Maple for my coffee table. Oh! Sweet goodness! That thing cuts straight.
 |
| It's a nice feeling when a saw you sharpened and tuned performs this well. Mind you, this was not a six foot long cut through two inch rock maple, but that's still pretty darned good for a novice. |
Sunday, October 30, 2011
Simonds Saga: part one
 |
| Just in time for Halloween...scary teeth. Here we're going to labor through sharpening my Simonds hand saw. I know, I know, "Mark, you've already done a sharpening post." Yeah, well this thing needs special attention. |
Let's talk about crosscutting
Since we've figured out a thing or two about sharpening a crosscut saw,
let's look at putting one to use. This is definitely not the
be-all-end-all guide. My method usually only involves marking the cut
line on the top of the board. I've added a step for this write up, and
for the foreseeable future, I'm going to continue to do it. The
additional step is to mark the line on the back of the board as well.
The idea is to reduce tearout on the backside of the cut. It works! And
to prove it, I made a second cut with no knife lines at all.
Saturday, October 29, 2011
Making Traditional Side Escapement Planes, With Larry Williams
...a review...
I like to think of myself as a budding tool maker. Truth is, I'm a wannabe. Seriously, let's look at this for a moment. Going back over the years you have Enos Baldwin, J.R. Tolman, Marley (those three come to mind because their tools are in my living room). There's Norris and Spiers. There's more and more. Today we have some great tool makers as well. Then there's me. Sure, I've got a few odd Krenov style planes. Planes that I love to work with. A few of them even have irons that I cut, hardened, and tempered myself. I am no tool maker. I'm a wannabe. Put me in a room with Larry Williams, and I'll shrink away and try to pretend to be a corner table.
I like to think of myself as a budding tool maker. Truth is, I'm a wannabe. Seriously, let's look at this for a moment. Going back over the years you have Enos Baldwin, J.R. Tolman, Marley (those three come to mind because their tools are in my living room). There's Norris and Spiers. There's more and more. Today we have some great tool makers as well. Then there's me. Sure, I've got a few odd Krenov style planes. Planes that I love to work with. A few of them even have irons that I cut, hardened, and tempered myself. I am no tool maker. I'm a wannabe. Put me in a room with Larry Williams, and I'll shrink away and try to pretend to be a corner table.
Thursday, October 27, 2011
On saw sharpening...
 |
| My 18" Disston D-100 loaded into the vise. A good saw vise can be had at an antique store. I see plenty of them around...you can find one. I always start with the handle to my left. I file from the handle down to the toe. Being a cross cut saw, file every other tooth...and we'll visit more on that in just a moment. |
Wednesday, October 26, 2011
The Taming of the Skew

Tuesday, October 25, 2011
A battered old chisel
 |
| No...wait...you should have seen this thing BEFORE I brought it home. Believe it or not, this is an improvement. An old 3/4" Craftsman chisel. It features my very own, incompetent, but effective and comfortable repair to the top of the handle. There's nothing wrong with the picture, the blade is really bent (it is also curved on top, not just canted). I have almost restored it to working condition. |
A couple old metal planes.
 |
| An older Craftsman plane. 9 3/4" with a 1 1/2" iron. This thing was in ROUGH shape when it followed me home. It is, still, in rough shape. However, after a little bit of work it has proven to be quite a nice smoother. It takes great shavings with the original iron. This one will likely remain ugly, there's really no need to try and tune it any further. |
 |
| The Craftsman, from the top. Yup...still ugly. |
 |
| This, I think, is a Lakeside. 9 1/2" with a 2" iron. The original iron has been 86'd. I replaced it with a standard Stanley iron. The sole and sides have been brought flat and square. Performs like a pig. I've got to fiddle with it some more. Open the mouth and it digs...close the mouth and it chatters. Ugh. It was Grampa's, and it may end up on my dad's mantle if I can't get it fettled. |
First of the saws
 |
| My Penn State rip saw. It is 5ppi, 26". Rather a heavy one too. I haven't found much about the Penn State Saw Corp. The plate is uber-hard and a pain to file. In fact, a couple of teeth broke when I tried to set it. I'm going to rejoint it, and refile the teeth as soon as I remember to get a new file that I don't mind killing on one saw. I'm putting this one up here first, since it is the first saw I took an interest in restoring. |
 |
| The "Quaker Oats Guy" etch. Of my old saws, this one has the strongest etch. This saw cleaned up nicely and is very straight. I'm not in a hurry to resharpen it, since I have picked up two new rip saws recently. |
Monday, October 24, 2011
Old tools...
 |
| My E.Baldwin planes. Three rounds (or are they hollows? I always screw that up) and a moving fillester. |
 |
| Marley match plane. I have no idea of age, or anything about the maker. Nice plane, though. |
 |
| My Stanley SW panel saw. Made (I think) around 1922. |
 |
| A Disston D-100. The plate is right around 18". A very nice worker. |
First post, an introduction
If you randomly stumbled upon this, well, my apologies.
We'll see as time goes by how well I keep up with this thing. I'm here to share (read take) woodworking techniques and related, uh, stuff. My primary interests are with old tools (for purposes of the blog anyway). After that it gets into doing stupid things with old British motorcycles, which I'm sure you're not interested in. Unless, of course, 300 pound overpowered antique 650's are your thing. They're my thing, because I'm a wrench and gear head. They are also part of the reason I want to learn the QUIET skills of working wood by hand.
I also tend to get rather worked up about politics, but I'll try to keep my ramblings on that topic to myself.
So, let's see if we can get this party started. I'm betting party is the wrong word. I don't often stay up past 10 o'clock and I'm not supposed to drink (much). We'll try again.
So, let's see if we can get this rather boring little blog started. There, that's more like it.
And if you're wondering about the name of this little blog, is has mainly to do with the fact that there is very little to do with partying or sins of the flesh going on inside my life. Damn.
Subscribe to:
Posts (Atom)