For the manner in which men live is so different from the way in which they ought to live, that he who leaves the common course for that which he ought to follow will find that it leads him to ruin rather than safety.
-Machiavelli

Please visit my new blog: http://baldwinmaker.blogspot.com
Showing posts with label measuring tools. Show all posts

Saturday, December 3, 2016

A Productive Morning

So, last night we left off with tossing a few blades into the kiln to be cooked. The new recipe worked great. Early this morning, I threw five more through the process. All of them came out as straight as they went in. I'm relieved! I'm definitely on the right track here. My paring knives were about 50/50 before. That's just not very good at all. On to the pictures...

One thing I wanted to do was fix this wheel. There is no spacer between the bearings, which meant that I couldn't torque up the axle bolt as much as I'd like. I decided to take care of that while the kiln was running.

Removed one bearing and got a measurement for the height of the spacer. In this case, it's OK to make it slightly long, but too short means that it isn't actually doing anything. I shot for a few thou over the nominal measurement.

Ready to reassemble and mount back onto the tooling arm. Notes on the process follow...

I still haven't finished my lathe. Mostly because I'm lazy. This needs to be done on the mill. NOT the way one would normally make this part, but that's life. As we said in the Army, "adapt and overcome."

To drill the hole, I put the spacer into my toolmaker's vise. My hold down clamps use two leveling screws each. Previously I had stainless socket heads. That's actually not a good idea, as they will score the mill bed. I switched them out to brass tipped set screws.

All clamped up.

The leveling screws lift the back of the clamp so that the clamp can provide the required holding force to hold the vise down. The actual block doesn't touch the bed.

Using the coaxial indicator to find the center of the spacer.

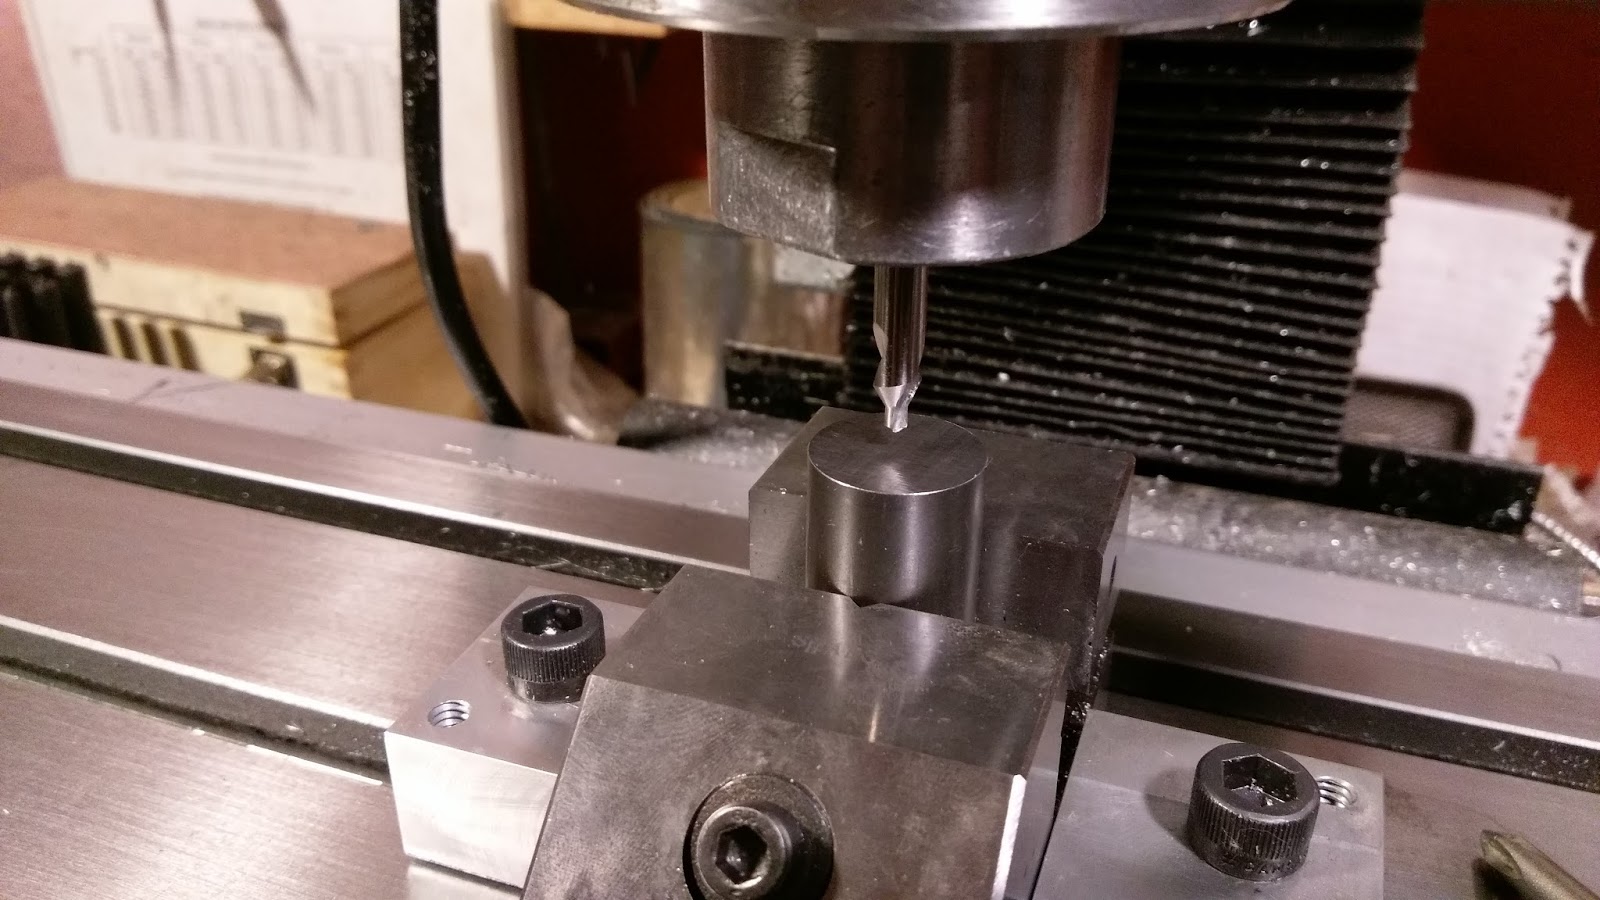
Always start with a center drill.

There's a part under there somewhere. You have to work your way up to the 1/2" drill, it's not practical to just power through.
As I finished up the spacer, blades were ready to come out.

I allowed three blades to cool in air, like normal. The two paring knives were quenched between the large aluminum blocks. It's amazing that there's enough heat energy in those two small knives to heat those blocks up within half a minute or so. They get nice and warm, which is sort of welcome this time of year when the basement gets a little chilly. The idea is that they cool the blades a bit faster than air, and can help to keep them straight too.

All of these were heat treated last night and this morning. All came out straight and like I said above, the change to my process seems to be what I needed. Nine blades that need to be finish ground and have their handles put on. I should have a fun week!

Friday, December 2, 2016

Keeping The Momentum

I gotta say, I feel reinvigorated after my vacation. Back to normal, or as normal as I get...a guy who's broken this many bones can only feel normal to a point. It's been a good week. Anywho...here's my evening as it stands:

Last night was a light work night. I worked on a tooling arm for my grinder and ground out this little guy. A piece of scrap kept staring at me, and I knew it wanted to become a knife. I need a small utility knife around the shop anyway, so I came up with this. I think it's sorta cool. It's ready for heat treat at this point.

Monday, July 25, 2016

New Gauge Out The Door

Thanks, Ralph for another opportunity...

This time, we're copying the actual slope of one of Ralph's wooden gauges, instead of using something standard like 1:7. No problem. I estimate the pitch of this gauge to be a little closer to 1:4. This is a more dramatic angle.

Saturday, July 9, 2016

Dovetail Gauges

You saw how they were made...now they are available for sale.
If interested, check out the "For Sale" page.


Thursday, July 7, 2016

Some New Dovetail Gauges

I was recently asked about making some dovetail gauges of the type used by Paul Sellers. Here's a pair, made in aluminum.

That was the easy part. Outside dimensions and square shoulders cut.

Thursday, May 12, 2016

New Ralph Gauges

Sorry, Ralph...for now, they're named after you!


I downsized Ralph's original gauge a bit. It's now 2 1/4" long, 3/4" grip with a 1 1/2" blade. These two have the same 1:7 slope. A little less bulky in your hand.

If anyone is interested, these will go for $70 including shipping in the lower 48 states.

Tuesday, April 5, 2016

Grinding Gauge

This one will make more sense once my next project is done:

When making knives, I've been using two main thicknesses: 1/16" and 3/32". Each side of this gauge is milled to 1/2 of a blade thickness.

Mill Stop

One way to cut down on set up time when machining parts is to be able to accurately place them in the mill without relocating them. That's easy on the Y-axis, as the vise is typically orientated with the rear jaw along that axis. The X axis requires a stop. Here is the one I just made:

The stop mounts down on to the mill table. The rod can be adjusted to set the location of the part.

In use. Once the X and Y zeroes are set, the rod can be set against the part. This will allow you to remove the part and place it back in the same position. This also applies to making multiple parts. The part currently in the mill vise is a gauge that will get it's own write up.

Friday, February 19, 2016

The Ralph Gauge

About a week ago, Ralph Boumenot asked if I could make a gauge for him. He'd been hunting for about 2 years for someone to make it for him.

Normally, I would have posted this as I made it. However, I wanted Ralph to receive his gauge before I posted anything. You can read about it from him here. 

Basically, what Ralph wanted was a solid brass dovetail marking gauge, based loosely on an older Hayward design. Instead of the double angle on the gauge that most of us are accustomed to, he wanted a 1:7 slope on one side and square on the other. Sure, you have to mark and flip as you lay out your dovetails, but you also have a built in square on your gauge. I think Ralph is onto something.

Following is about how I made it.  Just highlights, really. Sometimes I forget to take pictures when I get going.

Before starting, I wanted to make a 1:7 gauge of my own. This will get used later to mill the final angle into the finished product. It will replace the parallels that are usually used while milling a part.


Sunday, February 14, 2016

Mill Tram

Part of routine maintenance and set up of a milling machine is tramming. This is setting up the machine so that the head and table are in proper alignment. Typically this is done by swinging a dial indicator over the surface of the vice or table and adjusting as needed.

Thankfully, there's a time saving double indicator available to speed up the process.

Edge Technologies came up with this awesome set up. This is the miniature model The two indicators are 3" apart. I believe the standard model is 5". This size is good for my mill, since it is a bench top machine. Though slightly less accurate than a 5" spread, it still can set up your machine to a very high tolerance.

Monday, February 16, 2015

Squaring up

Important in making anything, whether in wood or metal, is making parts square. It's easy in metal, I put it in the mill. In wood, however, I need to plane by hand. It's nice when it all works out.

Even for simple projects, before anything else can happen, the stock you're using needs to be as square as you can get it. I'm not going to get into the process here, really. I was just very happy yesterday evening when I planed up a piece and found that it was as near perfect as I could imagine.

One of my 6" machinist's squares. I like them because they are way more accurate than a typical woodworking square. This particular one is within .0006" over it's length. I have a couple of different sizes here at home. I also use them at my shop and at work. My local hardware store has them and they are reasonably priced. Most would say that a square made to this level of accuracy is not required for woodworking, and they are likely correct. However, when you factor in cost, it's the best choice. I get these for about $20.

Saturday, January 31, 2015

Surface Gage is coming along

A quick action shot from last night

Current state...several little pieces left to make.

Friday, December 30, 2011

More on winding sticks

Yesterday, I made the statement that no hand tool shop should be without winding sticks. After almost two years of trying to learn this stuff, I only just made my first set a month or two ago. Wish I would have done that earlier! They are easy enough to make.
What the winding sticks do, is indicate the twist (wind) in a board. The first step in stock preparation is to knock the high spots down. The best way to find out where they are, is (you guessed it!) winding sticks!
Before planing for the first time, set the sticks on the board. Get your head down and sight across them. This is where the light band on the front stick becomes important. You'll see the wind in the board. The sticks will exaggerate the amount of twist to make it easier to see.

Thursday, December 29, 2011

Some measuring tools

Just a quick post about some measuring tools.
A set of winding sticks. Something that no hand tool shop should be without.

Wednesday, November 9, 2011

Panel Gauge

This is a panel gauge I picked up a while back. They are very nice to have, since a typical marking gauge is only 6". It had no pin or cutter, presumably it got lost along the way. I cut a drill bit down, and reshaped the end so I could have a cutting gauge as opposed to a pin. Using a cutter makes a mark more like a marking knife, they tend to tear less. The button on the end, just inside of the cutter makes a nice little depth stop, it limits how far you can push the cutter down.
Look closely at the shape of the cutter, the working end is facing up. Also shown is the "depth stop." I believe that the original pin or cutter was mounted in the button.